


Contents
Introduction to Growing Garlic
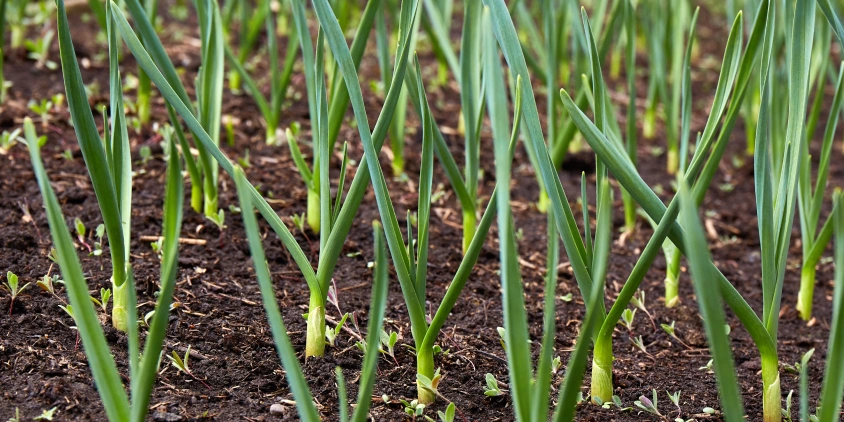
If you’ve ever wondered whether growing your own garlic is worth the effort, the answer is a resounding yes! Garlic isn’t just a kitchen superstar; it’s also one of the easiest crops to grow, even for beginners. By planting a few cloves and providing minimal care, you can harvest fresh, flavorful garlic bulbs that surpass store-bought options in taste and quality.
Beyond its culinary appeal, garlic offers numerous health benefits, such as boosting immunity and lowering blood pressure. Growing garlic at home also reduces your reliance on potentially chemically treated or imported produce. Its adaptability to various climates and growing conditions—from backyard gardens to balcony pots—makes it a favorite for gardeners. With varieties ranging from mild softneck to bold hardneck, there’s something for everyone.
Garlic requires little maintenance, thrives in diverse environments, and rewards your efforts with an unmatched sense of accomplishment. Ready to dive in? This guide will walk you through every step, from selecting the right variety to harvesting like a pro.
Choosing the Right Garlic Variety
When it comes to growing garlic, picking the right variety is key to success. Let’s break it down to make it easy for you.
Softneck Garlic
Softneck garlic is perfect for warmer climates and has a longer shelf life. It’s the type you often see in stores, with smaller cloves and a milder flavor. It’s also great for braiding, which can be a fun way to store your garlic.
Hardneck Garlic
Hardneck garlic thrives in cooler climates and produces larger cloves with a stronger, more complex flavor. This garlic variety also has a garlic scape (a long stalk) that can be harvested and eaten. While it doesn’t store as long as softneck garlic, its bold taste is worth it.
Popular Varieties
California White is a reliable softneck garlic variety that’s easy to grow. Rocambole is a hardneck garlic that offers a rich, intense flavor, ideal for culinary enthusiasts. Purple Stripe, another hardneck variety, is known for its deep, spicy kick.
Choosing the right garlic variety depends on your climate and flavor preferences. Once you’ve picked your garlic, you’re ready to start planting!
California White: A dependable softneck variety with mild flavor.
Rocambole: A hardneck garlic prized for its intense, rich taste.
Purple Stripe: A hardneck variety with a deep, spicy kick.
Choosing the right garlic depends on your climate and flavor preferences. Once decided, you’re ready to prepare for planting.
Preparing for Planting Garlic
Getting your garlic ready to grow starts with preparing the right environment. The effort you put into this step will pay off with a successful harvest of great garlic.
Timing Your Garlic Planting
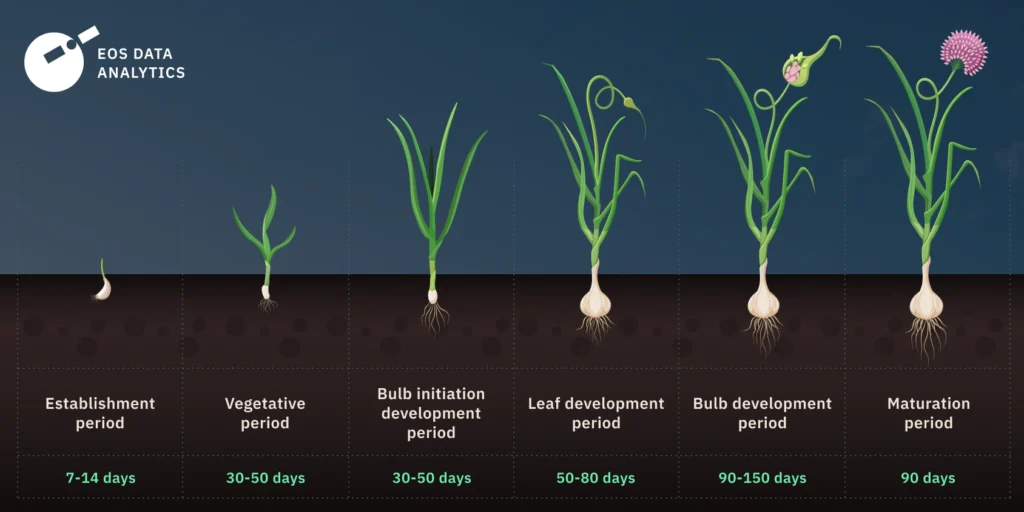
The best time to plant garlic is in the fall, allowing the garlic cloves to establish roots before the cold weather sets in. Planting in the fall gives garlic a head start, resulting in larger garlic bulbs by summer. If you live in a warmer climate, you can also plant garlic in early spring, although the bulbs may be smaller.
Choosing the Right Location to Plant Garlic
Garlic thrives in a sunny spot, so choose an area that gets at least six hours of sunlight a day. The soil needs to be well-drained to prevent rot, so avoid areas where water tends to pool. If your soil is heavy or clay-like, consider improving drainage by adding compost or organic matter.
Soil Preparation for Growing Garlic
Garlic prefers slightly acidic to neutral soil with a pH between 6.0 and 7.0. Before planting, test your soil to ensure it’s in the right range. To enrich the soil for growing garlic, mix in some organic compost or well-aged manure. This will provide the necessary nutrients for healthy growth.
Once you’ve got the timing, location, and soil ready, you’re all set for planting garlic. The next step is to separate your garlic bulbs and get those garlic cloves into the ground!

Planting Garlic
Now that your soil is ready, it’s time to plant your garlic. This is where the magic happens, so let’s get into the details.
Separating the Garlic Cloves
Start by breaking apart your garlic bulb into individual garlic cloves. Each garlic clove will grow into a new garlic bulb, so make sure to choose the largest, healthiest garlic cloves for planting. Avoid using cloves from store-bought garlic, as they may carry diseases or be treated with growth inhibitors.
Planting Depth and Spacing for Garlic
Plant each garlic clove with the pointed end facing up, about two inches deep into the soil. Space the garlic cloves about 4 to 6 inches apart. This gives each garlic plant room to grow without overcrowding, allowing the bulbs to reach their full potential.
Arranging Garlic in Rows
If you’re planting multiple rows of garlic, space them about 12 inches apart. This will give the garlic plenty of room to expand and allows for easy access when it’s time to care for and harvest garlic.
Once your garlic cloves are in the ground and covered with soil, give them a gentle press to ensure good contact. You’re now ready to move on to caring for your garlic plant as it starts to grow!
Caring for Garlic Plants
Once your garlic is planted, it’s time to focus on keeping it healthy and thriving. With just a little attention, your garlic will grow strong and ready for harvest.
Watering Garlic
Garlic needs consistent moisture, especially in the early stages of growing. Water it regularly, but make sure the soil doesn’t become soggy. Garlic prefers evenly moist soil, so aim to keep the ground damp but not waterlogged. As the garlic plants mature, you can reduce watering to avoid over-watering, which could cause the garlic bulbs to rot.
Mulching for Garlic
Mulch is your garlic’s best friend. Apply a thick layer of mulch, like straw or leaves, around your garlic plants. Mulch helps retain moisture, suppresses weeds, and keeps the soil temperature stable. It’s especially useful in the winter, protecting your garlic from freezing temperatures while it’s still developing its roots.
Fertilizing Garlic Plants
Garlic benefits from a bit of extra nutrition. Early in the growing season, use a nitrogen-rich fertilizer or compost to encourage strong leaf growth. However, be sure to stop fertilizing a few weeks before harvesting garlic. Over-fertilizing late in the season can result in smaller garlic bulbs.
With regular watering, mulch, and the right fertilizer, your garlic will be on its way to a successful harvest. Keep an eye on your garlic as it grows, and you’ll be rewarded with healthy, flavorful garlic bulbs.

Harvesting Garlic
After months of care, it’s finally time to reap the rewards of your hard work. Harvesting garlic is a simple process, but timing is everything.
When to Harvest Garlic
The key to knowing when your garlic is ready to harvest is watching the leaves. As the garlic matures, the lower garlic leaves will start to yellow and dry out, while the top leaves remain green. When about half to two-thirds of the leaves are brown, it’s time to dig up your garlic bulbs. If you wait too long, the garlic bulbs could split open or begin to rot in the ground.
How to Harvest Garlic
To harvest garlic, gently loosen the soil around the bulbs using a shovel or garden fork. Be careful not to damage the garlic bulbs while digging. Once the garlic is free from the soil, gently pull it out by the stalk. Avoid pulling too hard, as this could cause the garlic bulbs to break apart.
Handling and Curing Garlic
After harvesting garlic, shake off any excess dirt and lay your garlic out in a dry, shaded area with good airflow. You can either hang the garlic in bunches or lay the garlic bulbs flat on a mesh screen. Let it cure for two to four weeks, allowing the garlic skins to dry out and the flavor to fully develop. Once fully cured, trim the roots and stalks, and store your garlic in a cool, dry place.
With proper timing and care, your homegrown garlic will be ready for cooking, storing, or sharing with friends and family!
Storing Garlic
Proper storage is key to keeping your garlic fresh for months to come. With the right conditions, you can enjoy your homegrown garlic well past the growing season.
Ideal Storage Conditions for Garlic
Garlic should be stored in a cool, dry place with good airflow. A temperature range of 60-65°F (15-18°C) is ideal. Avoid storing garlic in a humid or wet environment, as this can cause it to rot. A pantry, cellar, or well-ventilated room works best.
How to Store Garlic
Once your garlic is cured, you can store it in a few different ways. For individual garlic bulbs, simply place them in mesh bags or baskets that allow air circulation. If you prefer to braid your garlic, softneck varieties are perfect for this, and the braids can be hung in a dry, cool area. Another option is to store garlic in a cardboard box or crate, as long as it’s well-ventilated.
Using and Enjoying Stored Garlic
Garlic can last for several months when stored correctly, with softneck varieties typically lasting longer than hardneck. Over time, the garlic cloves may begin to sprout, but they’re still safe to eat—just remove the sprouts before cooking. For longer-term storage, you can also freeze garlic or preserve it in oil, but be cautious with oil preservation to avoid the risk of botulism.
With the right storage techniques, you’ll have homegrown garlic that lasts and stays flavorful, ready to enhance your meals throughout the year!
Troubleshooting Common Issues
Even with the best care, garlic can sometimes face a few challenges. Here’s a guide to help you troubleshoot and keep your garlic growing strong.
Garlic Not Growing
If your garlic isn’t sprouting or growing as expected, the issue could be with the planting depth or timing. Make sure you planted the cloves at least two inches deep and at the right time of year—too early or too late can affect growth. If the soil is too cold or wet, the cloves may not take root properly. In this case, try planting in well-drained soil and wait for the right season.
Bulbs Not Forming Properly
If you notice that your garlic is growing tall but the bulbs aren’t forming as expected, there could be a few reasons. Garlic needs plenty of space to grow, so ensure the cloves are spaced out properly, allowing room for the bulbs to develop. Soil that’s too rich in nitrogen may encourage leaf growth at the expense of bulb formation. In this case, stop fertilizing with high-nitrogen fertilizers once the plants are established.
Rotting Bulbs
Garlic bulbs can rot due to excessive moisture, poor drainage, or fungal infections. If your garlic bulbs are soft or mushy, it’s likely that rot has set in. Ensure that you’re planting garlic in well-drained soil and avoid overwatering. If you suspect fungal issues, rotate your crops each year to prevent the spread of soil-borne diseases.
Weak or Small Leaves
If the leaves of your garlic are weak or pale, this could be a sign of nutrient deficiencies or pest damage. Garlic needs balanced nutrients, especially during its growing phase. You can apply compost or organic fertilizer to give it a boost. Check for pests like aphids or thrips that might be damaging the leaves, and treat accordingly with organic insecticidal soap.
By identifying and addressing these issues early on, you can keep your garlic plants healthy and productive, ensuring a successful harvest.
Conclusion
Growing garlic at home is a rewarding and relatively simple process that yields flavorful, homegrown bulbs perfect for cooking. By choosing the right variety, preparing your soil, and giving your plants the care they need, you can enjoy a successful harvest. From planting to storing, each step plays a crucial role in ensuring your garlic grows strong and healthy.
Remember, garlic doesn’t require a lot of attention, but a little extra care—whether it’s proper watering, mulching, or troubleshooting common issues—will go a long way. Once you’ve harvested and stored your garlic, you’ll have a supply that can last for months, adding a delicious touch to every meal. So, grab your cloves, get planting, and enjoy the benefits of growing your very own garlic!